How to read this document
The Charter is divided into Laws, each Law into sections, and each section into paragraphs. Every paragraph carries a number -- Law, section, paragraph, as in 6.4.2 -- and a paragraph that lists cases letters them, as in 6.4.2b. This file and the printed edition carry the same numbers. A number in parentheses is a cross-reference to the paragraph or section it names, and in this file the words before it are also a link.
Precedence. Where the Charter and any other statement of the rules disagree, the Charter is right: it wins over the Learn to Play, over the text printed on a card or a board, and over the bot. Where the Learn to Play simplifies, it says so and names the Law it simplifies.
Training, standard and advanced mode. Laws 1 to 17 are the whole of the game in training mode. Part II is what the other two modes add and change: Law 18 says which mode plays what, Law 19 is the gambits, Law 20 the species abilities and Law 21 the personal abilities. A rule in Part II wins over a rule in Part I for a game playing the module it belongs to, and applies nowhere else.
Defined terms are in bold where they are defined, and every one is listed in Appendix B with the paragraph that defines it.
Notes are set apart under a paragraph and begin with the word Note. A note explains; it is never a rule, and it is never numbered.
The point of view. Every rule is written from the point of view of the team it applies to. Forward means toward the goal a team is attacking and back means toward the goal it is defending, so the two words point opposite ways for the two sides.
Part I -- The game
Law 2Components and definitions
2.1The field
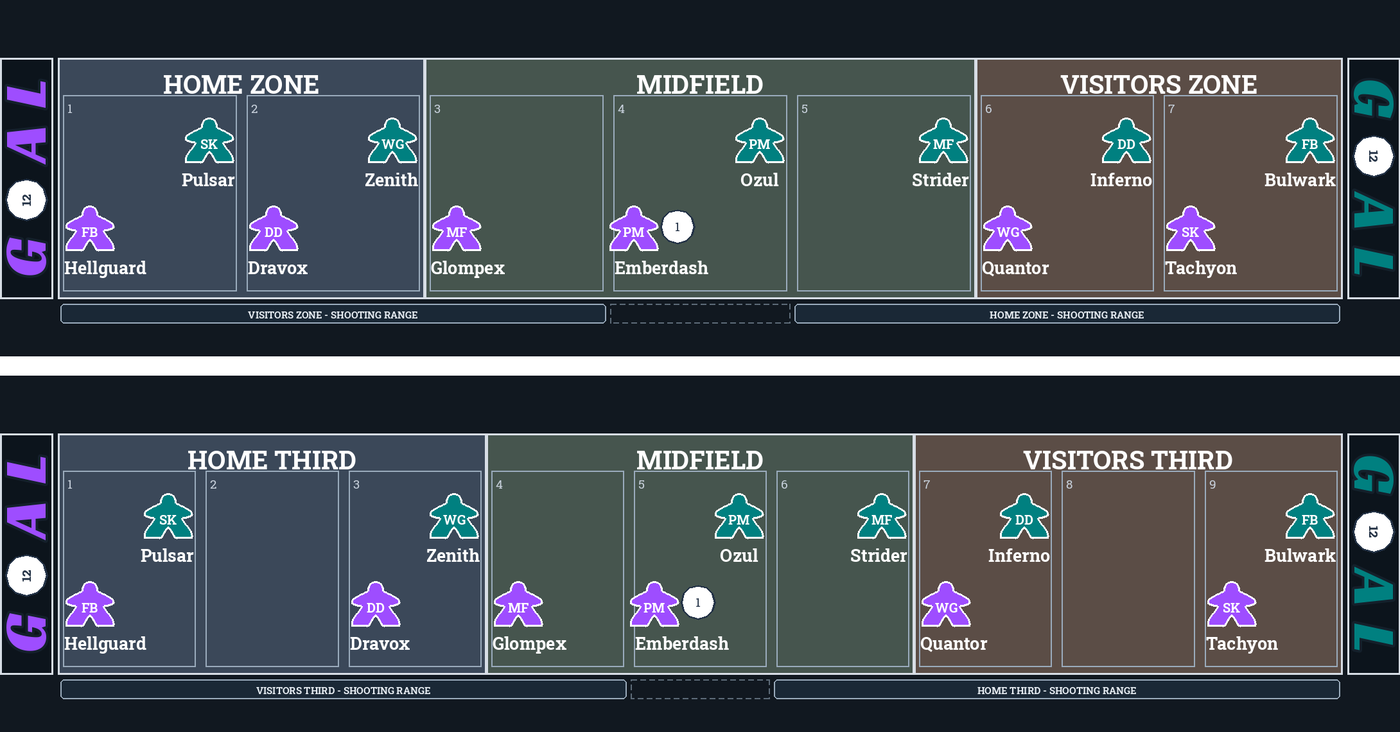
2.1.1 The field is a row of spaces divided into three zones, left to right: the home goal, midfield, and the visitors goal. A game is played on a board of 7 or 9 spaces.
| Board | Home goal | Midfield | Visitors goal |
|---|
| 7 (default) | 2 | 3 | 2 |
| 9 | 3 | 3 | 3 |
2.1.2 On the board itself, the two outer zones are labelled Home Zone and Visitors Zone -- Home Third and Visitors Third on the 9-space board, the only one where all three zones are equal.
2.1.3 A space is named by its zone's letter and its position counted from the home end: H1 and H2 are the home goal on board 7, M1 to M3 its midfield, V1 and V2 the visitors goal.
2.1.4 A space belongs to nobody. Any number of meeples from either team may stand on one, and distances are counted in spaces straight across the zone boundaries.
2.2Forward and back
2.2.1 The home team attacks the visitors goal and the visiting team attacks the home goal.
2.2.2 Forward means toward the goal a team is attacking and back means toward the goal it is defending. The two words point opposite ways for the two sides, and every rule in this document is written from the point of view of the team it applies to.
2.3Shooting range
2.3.1 A team may only shoot from within its shooting range, which is the far part of the field measured from the middle of the board. It is not a zone: it takes in the goal zone a team attacks and cuts partway across midfield.
| Board | The visitors may shoot from | Neither | Home may shoot from |
|---|
| 7 | H1, H2, M1 | M2 | M3, V1, V2 |
| 9 | H1, H2, H3, M1 | M2 | M3, V1, V2, V3 |
2.3.2 Both boards have an odd number of spaces, so both have a true middle space, and that space is in neither team's range.
Note. The middle space is also the kickoff space, so no restart ever begins in range.
2.4The kickoff space
2.4.1 The kickoff space is the middle space of midfield, and both teams kick off from it.
2.4.2 Every arrangement a coach settles has to cover their own kickoff space -- see finishing a Coaching Choice (14.8).
2.5Occupancy
2.5.1 Meeples share spaces freely in the run of play. Nothing in a maneuver, a contest or a walk-in is ever refused because a space is crowded.
2.5.2 Coverage binds deliberate placement instead: a team may not put a second meeple on a space in a zone while another space in that zone has none of theirs on it.
2.5.3 Coverage is checked one team at a time, so an opposing meeple never covers a space on your behalf. Where a zone holds more of a team's players than it has spaces, they cover every space first and the surplus stacks.
2.6Players and roles
2.6.1 A team is nine players, and in training mode the two teams are identical.
2.6.2 Every player has an offensive skill from 1 to 6 and a defensive skill that is its inverse, so the two always total 7.
| Role | Offense | Defense | Ability |
|---|
| Fullback | 1 | 6 | +1 space on a pass or a deflection: a High Pass up to 4, a Deflect of 2, a Clear of 4, a Setup Pass that may also reach 4. |
| Defender | 2 | 5 | A won Pressure also steals the ball. |
| Midfielder | 3 | 4 | Adds 3 to a skill test for a Low Pass or a Steal. |
| Playmaker | 4 | 3 | May advance an additional space when resolving a Dribble maneuver: 2 spaces with a Dribble Advance, or 5 with a Dribble Burst. |
| Winger | 5 | 2 | A completed Low Pass may set up a scoring opportunity. |
| Striker | 6 | 1 | Adds 3 to a score attempt taken off a set-up. |
2.6.3 Each squad is one Fullback, two Defenders, one Midfielder, two Playmakers, one Winger and two Strikers. Beyond the standard deal, no role belongs to any particular zone.
2.7The ball, the dice and the tokens
2.7.1 The ball is a d12, and the face it shows is its speed.
2.7.2 Every roll in the game is a d12: one each for a skill test or a score attempt, and two for an own-goal roll.
2.7.3 Maneuvers are chosen in secret from the six maneuver cards -- twelve in a game played with gambits (19).
2.7.4 A player's exhaustion tokens sit on their card. A player carrying more tokens than their defensive skill is Exhausted; a player who fails an injury check is Injured -- see Law 15.
2.8Definitions
2.8.1 A player's card is assigned to a zone and their meeple stands on a space. Play pulls the two apart, and a run back is what puts them back together.
2.8.2 The handler is the player with the ball, taking their team's turn with it -- see choosing the handler (4.2).
2.8.3 The challenger is the defending player who meets a maneuver on the ball's space -- see determining the two players (6.1).
2.8.4 The carrier is the player a resolution leaves the ball with. The carrier handles the ball on their team's next turn without a choice being offered, and never runs back -- see choosing the handler (4.2) and running back after a steal (12.4).
2.8.5 An arrangement is where a coach's meeples were standing when they last closed a Coaching Choice (14). It is what a new play puts them back on.
2.8.6 A set-up is a scoring opportunity a maneuver has created: a shot its receiver may take out of turn -- see scoring opportunities (8).
2.8.7 A skill test is an opposed roll, one d12 to each side -- see the skill test (6.4).
2.8.8 A contest is a skill test for a ball nobody is holding -- see contests for the ball (10).
2.8.9 Sending a player is a walk-in to the ball's space, paid for in exhaustion -- see sending a player (9).
2.8.10 A ball is loose when it has come to rest on a space with nobody standing on it -- see where the ball comes to rest (10.1). A ball that comes down on somebody is not loose.
2.8.11 A space minute is the unit of game time -- see the clock (16).
2.8.12 A live ball is one in play. A dead ball is one being brought back into play after a goal, a missed shot, an own-goal roll, a ball out of bounds or a period's start: it is carried to where play starts again rather than travelling over the spaces between.
2.8.13 Exhausted and Injured are the two conditions a player can be in -- see Law 15. In standard and advanced mode a Cyborg's own words for them are Drained and Damaged -- see Lithium Powered (20.3).
2.8.14 Behind is the condition under which a coach holds gambits in advanced mode -- see who may play a gambit (19.3).
Part I -- The game
Law 3Setting up a game
3.1Winning the toss
3.1.1 Choose a 7- or 9-space board.
3.1.2 One coach flips the coin: a fortune face wins them the toss and a doom face hands it to their opponent.
3.1.3 The winner chooses whether to be home or the visitors. Home kicks off the first half and the visitors kick off the second.
3.2The standard deal
3.2.1 Both sides are dealt into 2-2-2 by role: the Fullback and one Defender in their own goal, the Midfielder and one Playmaker in midfield, the Winger and one Striker in the goal they attack. The remaining Defender, Playmaker and Striker start on the bench.
3.2.2 A goal zone's two cards take the two ends of the zone, and midfield packs from that side's own end outward. On board 7 that comes out the same as filling each zone in order. It is only visible on board 9, whose zones are three spaces deep: home deals to H1, H3, M1, M2, V1 and V3, and the visitors deal the mirror of it.
Note. Midfield packs rather than spreads because the kickoff space is in it. Every arrangement has to cover its own side's kickoff space, and packing from a side's own end reaches that space on every board.
3.3Setup coaching
3.3.1 Home takes a Coaching Choice (14) and then the visitors take one.
3.3.2 Setup substitutions are unlimited, and a player taken off at setup goes back to the bench rather than being retired -- nobody has played yet.
3.3.3 Each coach finishes with a player on their own kickoff space, and the positions they finish on become that side's first arrangement.
3.4Kickoff
3.4.1 The ball goes on the kickoff space at speed 1 in home's possession, with the clock at 00.
Part I -- The game
Law 4The turn
4.1The order of a turn
4.1.1 The team in possession takes a turn, in this order:
4.1.2 Whichever team has the ball at the end of all that takes the next turn.
4.2Choosing the handler
4.2.1 Any of the possessing team's players standing on the ball's space may handle it, and the coach picks between them -- unless the last resolution left the ball with one player in particular, the carrier, in which case that player handles it and there is nothing to choose.
4.2.2 These leave the ball with a particular player:
- a. a Dribble Advance, with the player who dribbled it;
- b. a completed Low Pass and a received 2-space High Pass, with the receiver;
- c. a Steal, with the interceptor;
- d. a ball won where it came to rest, or a won High Pass contest, with the winner;
- e. a Pressure, with the handler who was shoved back still holding it -- including one who has just survived an own-goal roll, and with the Defender instead where their Pressure also stole it.
4.2.3 These leave it with nobody in particular: a kickoff or any other restart, and a required pickup (10.6). A Deflect (6.8) leaves nobody in possession at all, so who gets it is settled -- by a contest, or automatically if only one side is there -- before anybody handles it.
4.2.4 The carry holds for one turn only. If that player is no longer on the ball by the time the turn comes round, their coach chooses in the ordinary way.
4.2.5 The player holding the ball never runs back (12.4).
4.3Choosing the action
4.3.1 A score attempt is offered only inside the team's shooting range (2.3).
4.3.2 A maneuver is always available.
4.3.3 A time out (13) is offered only outside shooting range, only while that side still has its time out for the half, and never once last possession (16.3) has been declared.
4.4Finishing the turn
4.4.1 The ball where it came to rest (10.1) comes first: an action that left nobody holding it is settled before anything else, however it left the ball there.
4.4.2 Then the turnover, if the ball changed hands. A steal (12.4) runs players back and play carries straight on; a new play (12.5) resets both sides and offers a Coaching Choice.
4.4.3 Then the clock, by the action's own cost -- which is charged whether or not the action turned the ball over. Running back, resetting, contests, rolls, pickups and Coaching Choices all cost no time.
4.4.4 If the clock has reached the period's last minute, last possession (16.3) is in force.
Part I -- The game
Law 5Score attempt
5.1When a shot may be taken
5.1.1 A shot may only be taken from within the shooting team's range (2.3).
5.2The roll
5.2.1 The handler shoots and both coaches roll one d12.
5.2.2 The attack adds the shooter's offensive skill, the ball speed modifier (7), and 3 more if a Striker is shooting off a set-up (8). The defense adds the skill of every defending player in the way, as what the defense adds (5.3) says.
5.2.3 The attack scores on a total equal to or higher than the defense's.
5.3What the defense adds
5.3.1 A defending player standing on the ball's own space adds their whole defensive skill.
5.3.2 A defending player standing anywhere between the ball and the goal being shot at adds half of it, rounded up.
5.3.3 A defender behind the ball adds nothing at all.
5.3.4 The halving is per player rather than over the group: two defenders of 5 in the way add 3 + 3 = 6, where halving their combined 10 would give 5.
5.4The cost of a shot
5.4.1 An ordinary shot costs its shooter nothing. A shooter taking a shot off a set-up exhausts 1 after the roll, whether it went in or not.
5.4.2 A score attempt costs 1 space minute, and a set-up's shot costs that on top of the maneuver that created it.
5.5After the shot
5.5.1 Goal or miss, the ball is dead and the game restarts as a new play (12.5), with speed back to 1.
5.5.2 A goal restarts from the conceding side's own kickoff space with them in possession. Every arrangement is required to cover that space, so nothing further is owed.
5.5.3 A miss gives the ball to the side that just defended it, on the space closest to their own goal, which carries no such guarantee: if nobody of theirs is standing there once the reset settles, they pick it up (10.6) exactly as after an out-of-bounds ball.
Part I -- The game
Law 6Maneuvers
6.1Determining the two players
6.1.1 The player maneuvering for the offense is the handler.
6.1.2 A defending player already standing on the ball's space challenges. They have nowhere to walk and nothing to pay, so that challenge cannot be declined, and nobody may be walked in past them. Where more than one of them shares the space, the defending coach chooses which of them challenges.
6.1.3 Otherwise the defending coach may send a player (9) to the ball's space, who exhausts 1 per space, or send nobody rather than pay for the challenge.
6.1.4 With no challenger, the maneuver the offense chooses succeeds outright: there is nothing to reveal against, no ranking to read and no test to roll. Nobody moves and nobody pays.
6.2Choosing and revealing
6.2.1 Both coaches secretly choose one of their maneuvers and reveal together.
6.2.2 The offense chooses from Low Pass, Dribble Advance and High Pass; the defense from Deflect, Steal and Pressure. In a game played with gambits (19) a coach who may play one chooses from six -- see Law 19.
6.3Who wins
6.3.1 The three ranks a side form a cycle. Equal ranks tie.
| Offense | Deflect (D1) | Steal (D2) | Pressure (D3) |
|---|
| Low Pass (O1) | Tie | Steal wins | Low Pass wins |
| Dribble Advance (O2) | Dribble Advance wins | Tie | Pressure wins |
| High Pass (O3) | Deflect wins | High Pass wins | Tie |
6.3.2 An injured (15.4) participant changes this in both directions: a maneuver they would have won outright goes to a skill test they have to win, and a tie against one healthy opponent is their automatic loss with nothing rolled.
6.4The skill test
6.4.1 Both participants exhaust 1, and then each rolls a d12.
6.4.2 The offense adds the handler's offensive skill and the defense adds the challenger's defensive skill. On top of that:
- a. a Midfielder adds 3 more when the maneuver being tested is their own Low Pass or their own Steal;
- b. a defense contesting with Steal adds the ball speed modifier (7).
6.4.3 The higher total wins and their maneuver is what resolves.
6.4.4 A tie is rolled again, and each participant exhausts 1 more for it.
6.4.5 When the test finally resolves, every participant who is Exhausted takes an injury check (15.3).
6.5Low Pass
6.5.1 Rank O1. Costs 1 space minute. Beats Pressure, loses to Steal.
6.5.2 The ball goes to a teammate, and there are at most three destinations to choose between: the nearest teammate up to 2 spaces ahead of the ball, the nearest teammate up to 2 spaces behind it, and a teammate standing on the ball's own space. A nearer teammate blocks a farther one in the same direction, so the choice is between directions rather than distances. Where several teammates are standing on the destination, the passer chooses which of them receives it.
6.5.3 A pass has to reach a different player -- the handler cannot pass to themselves -- and a pass across a shared space also sends the passer 1 space forward if there is field to move into.
6.5.4 Ball speed rises by 1, to a maximum of 12. The ball is left with the receiver.
6.5.5 With no legal destination at all, the maneuver still resolves: the ball rolls 1 space forward, its speed still rises, and it settles where it lands (10.1).
6.5.6 Winger: a completed Low Pass may offer its receiver a scoring opportunity (8), at any of the three distances, if the ball is in shooting range.
6.6Dribble Advance
6.6.1 Rank O2. Costs 1 space minute. Beats Deflect, loses to Pressure.
6.6.2 The handler and the ball move 1 space forward together. The handler then changes the ball's speed by up to their offensive skill, in either direction, within the range 1 to 12.
6.6.3 The ball is left with the handler.
6.6.4 Playmaker: may advance 2 spaces instead of 1 -- an additional space.
6.7High Pass
6.7.1 Rank O3. Costs 2 space minutes. Beats Steal, loses to Deflect.
6.7.2 The ball is thrown 2 or 3 spaces forward, and a Fullback may throw it 4. Only distances that land on a space the field actually has are offered, and a distance is dropped when a shorter one already reaches the space it would land on -- the longer throw would be the same pass at a disadvantage.
| The throw | What happens |
|---|
| 2 spaces, a teammate on the landing space | Received. The ball is left with the receiver, who may take a scoring opportunity (8) if it is in range. |
| 3 or 4 spaces, a teammate there | Received but contested: the receiver has to win the High Pass contest (10.4) to keep it. |
| Nobody there | The ball is loose (10.1). |
6.7.3 A 2-space pass that lands short of shooting range is still received. The range rule takes away the shot, not the catch.
6.7.4 An overshoot is a throw that runs out of field. With the ball 0 or 1 spaces from the end, every distance lands on the same last space, so nothing is offered and the throw overshoots before anyone chooses. An overshoot onto a teammate offers that receiver the scoring opportunity or the High Pass contest: they are two halves of one choice, declining the shot means taking the contest, and the ball speed modifier counts against them either way.
6.7.5 A passer never receives their own pass. Thrown from the last space the ball comes straight back down where it was, and a teammate sharing that space receives it and is offered the choice above.
6.7.6 With no other teammate on that last space, there is nowhere left to throw it and nobody to throw it to: the ball goes out of play (10.5), the other team gains possession, and the gaining side sends somebody to pick it up. The throw still costs its 2 minutes.
6.8Deflect
6.8.1 Rank D1. Costs 1 space minute. Beats High Pass, loses to Dribble Advance.
6.8.2 The ball moves 1 space back -- toward the goal the offense is defending. Ball speed drops by 1, never below 1. Neither player moves.
6.8.3 Fullback: deflects the ball 2 spaces instead of 1.
6.8.4 A Deflect turns nothing over by itself, and settles nothing either: it knocks the ball out of anybody's possession, so what happens next depends on who, if anyone, is standing where it lands. That is the ordinary three-way rule (10.1): nobody there and it is loose, one side there and it is theirs, both there and they contest it on the spot.
6.8.5 The one exception is a deflection that runs out of field and comes to rest on the space of the player who played the Deflect: rather than being contested, that player gets a scoring opportunity (8). Only the player who played the Deflect may take it, even with teammates standing on the same space. Possession flips for it and speed resets, and it is the shot that follows -- goal or miss -- that makes the new play. A deflection that runs out of field and comes to rest anywhere else sets up nothing, and lands by the ordinary rule above.
6.9Steal
6.9.1 Rank D2. Costs 1 space minute. Beats Low Pass, loses to High Pass.
6.9.2 Possession flips and ball speed resets to 1. The challenger and the ball then move 1 space back for their side, toward the goal the new possessing team is defending.
6.9.3 Once everyone has run back, the interceptor changes the ball's speed by up to their defensive skill, in either direction.
6.9.4 The ball is left with the interceptor, who therefore does not run back.
6.10Pressure
6.10.1 Rank D3. Costs 1 space minute. Beats Dribble Advance, loses to Low Pass.
6.10.2 The handler and the ball go 1 space back, toward the goal the offense is defending, and the challenger moves 1 space forward onto the same space. Possession does not change, and the ball is left with the handler.
6.10.3 Where the handler is already standing on the space closest to their own goal there is nowhere to push them, and the pressure risks an own goal (11) instead.
6.10.4 Defender: a won Pressure also steals the ball -- unless the push overshot into an own-goal roll, which takes priority whichever way it goes.
Part I -- The game
Law 10Contests for the ball
10.1Where the ball comes to rest
10.1.1 Some actions leave the ball on a space with nobody named as holding it -- a pass that reaches nobody, a Deflect (6.8), and in advanced mode a Clear (19.8) or a beaten Setup Pass (19.7). What is standing on that space decides what happens, and there are three answers.
| On the space the ball lands on | What happens |
|---|
| Nobody | The ball is loose. Each side may send a player (9) after it, or send nobody. |
| One side only | The ball is simply theirs, uncontested. No roll, and the other side is not offered a send. |
| Both sides | A contest. The players already standing there roll for it, and nobody else may be sent. |
10.1.2 "Loose" means the space was empty, and it means nothing else. A ball that comes down on somebody has not gone loose: either it has landed on a player who simply has it, or it has landed between two who fight for it on the spot. Nobody walks in on either -- a side is offered a send only against an empty space.
10.1.3 Where a side has several players on the space, their coach picks which of them takes the ball or contests for it. A player already standing there is not sent anywhere and pays nothing, and their side may not withhold them.
10.2The contest
10.2.1 Both contestants roll a skill test: the side that last had the ball adds their player's offensive skill, the other side adds their player's defensive skill.
10.2.2 The higher total wins the ball and is left holding it. A tie is rolled again, and each exhausts 1.
10.2.3 Neither side adds the ball speed modifier (7) -- the ball is nobody's yet. A High Pass contest (10.4) is the one exception.
10.3A loose ball
10.3.1 A loose ball is contested the same way, once each side has decided who to send.
10.3.2 Where both sides send somebody they roll as above; where only one does, that player takes the ball without a test; where neither does, the ball goes out of bounds (10.5). Only an empty space can come to that.
10.4The High Pass contest
10.4.1 A High Pass of 3 spaces or more onto a teammate is caught, but not kept: the receiver has to win a contest to keep it, and the receiver standing on the ball is their side's contestant. An overshot pass whose set-up was declined comes to the same place. A pass of 2 does not -- a teammate there simply receives it and possession does not change, exactly as with a Low Pass (6.5).
10.4.2 A High Pass is the one exemption to where the ball comes to rest (10.1). A landing space holding only one side's players may still be contested by the other, who send a player (9) after it exactly as they would to an empty space. Every other way the ball comes to rest is settled by whoever is already standing there.
Note. The ball is high in the air, which gives players time to run towards it.
10.4.3 Otherwise it is the contest (10.2) above, with one difference: the side that threw the pass adds the ball speed modifier (7), and adds it against themselves if the pass overshot.
10.4.4 A pass that reaches nobody carries no modifier. It is not this contest at a disadvantage; the ball is simply loose on an empty space, and there is no receiver for the throw to have favoured.
10.4.5 The ball is left with the winner. A receiver who loses it has been stolen from.
10.5Out of bounds
10.5.1 Where neither side sends anybody after a loose ball, the ball goes out. The side that did not have it takes over at speed 1.
10.5.2 It is a new play (12.5) rather than a steal -- nobody took the ball off anyone, it simply went dead. Once both sides have reset, the side that gained it picks the ball up (10.6).
10.6Picking the ball up
10.6.1 An out-of-bounds ball, a missed shot (5), an avoided own goal (11) and a time out (13) can all leave the ball on a space nobody of the gaining or keeping side is standing on. Once everything else has settled, that side sends a player (9) to the ball's space -- unless one of theirs is already standing there, which settles it for nothing.
10.6.2 Every pickup is the same, whichever of the four left it owed. The coach of the side with the ball is offered the two nearest (9.2) -- the nearest in front of the ball and the nearest behind it, only the one in front where the ball is at the end of the field, and every player tied for nearest -- and must send one of them: a pickup cannot be declined. The player sent exhausts 1 for every space they travel, after a time out as after anything else.
10.6.3 A pickup is a placement rather than a contest: nobody rolls for it, nobody may contest it, and the ball is left with nobody in particular afterwards.
10.7Who has been stolen from
10.7.1 The ball ending up with the side that did not last have it is a steal (12).
Part I -- The game
Law 12Turnovers
12.1 Every change of possession resets ball speed to 1. There are two kinds, and what follows is different for each.
| Cause | Kind | What follows |
|---|
| Steal, a Defender's won Pressure, a lost High Pass contest, a loose ball the other side wins -- and in advanced mode Intercept and a beaten Dribble Burst | Steal | Players run back. No pause and no Coaching Choice: the ball is still live. |
| A goal, a missed shot, an own goal conceded or avoided, a ball out of bounds -- and in advanced mode a Setup Pass that found nobody | New play | Both sides reset, and the side with the ball may call a Coaching Choice. |
12.2 A time out (13) is a new play too, though not a turnover: possession does not change, but both sides reset and the ball goes back to speed 1.
12.3 Only a turnover moves anybody. A resolution that leaves possession where it was runs nobody back and resets nobody, however far out of position it left them -- a receiver who won their High Pass contest, the defender who walked in and lost it, a side that recovered its own loose ball. Whoever is out of position stays there, and pays nothing for it, until a turnover comes.
12.4Running back after a steal
12.4.1 A steal sends players back to their own zones. Two groups run, on both sides:
- a. everyone standing outside the zone their card is assigned to -- they have to come back, so the only question is which space;
- b. one of any group of teammates sharing a space, while their zone still has a space with none of their team standing on it.
12.4.2 Nobody else moves. A player alone in their own zone is already where they belong and pays nothing, and the player holding the ball never runs back.
12.4.3 A player running back goes to a space in their own zone that their team has not covered, and exhausts 1 for every space they travel. Where the zone is already covered, any space in it will do.
12.4.4 Where two teammates share a space, the one holding the ball stays and the other runs back. Where neither of them is holding it, their coach chooses which of them goes.
12.4.5 A stack only has to break up while its zone still has an uncovered space. A formation that puts more players in a zone than the zone has spaces settles doubled up, and nobody moves.
12.4.6 Running back never changes an arrangement.
Note. The scramble a steal forces is not a shape anybody chose, and the next new play undoes it.
12.5Resetting after a new play
12.5.1 Every fielded meeple on both sides goes back to the space its coach's arrangement (14) puts it on. It costs nobody anything, and it happens before either coach is offered a Coaching Choice.
12.5.2 Because every arrangement covers its own side's kickoff space, a goal restarts without anybody having to be dropped back to take the kickoff.
12.5.3 An out-of-bounds ball is picked up (10.6) after the reset, at the usual cost -- an arrangement covers a side's zones, not wherever the ball happens to be lying.
Part I -- The game
Law 14Coaching Choice
14.1What a Coaching Choice is
14.1.1 A Coaching Choice is a pause. The coach may take any number of the actions below, in any order, and then finish. None of it costs exhaustion or time.
14.2What a coach may do
14.2.1
| Action | What it does |
|---|
| Formation | Re-deals the six on the field into a new shape. |
| Substitution | Brings a player on for one on the field. Whoever comes on inherits the outgoing player's zone and stands where they stood. |
| Zone assignment | Trades two fielded players' zones, cards and meeples together. |
| Space positioning | Moves a meeple to another space in its own zone. Where the target is taken and the mover would leave their own space empty, the two trade places. |
14.2.2 The Coaching Choice before the shootout offers the substitution alone.
14.3When a coach gets one
14.3.1
| When | Substitutions | Who goes first | A player taken off | Positioning |
|---|
| Setup | Unlimited | Home, then the visitors | Returns to the bench | Yes |
| A new play | 2 per half | The side that called it, then the reply | Goes to the back bench | Yes |
| A time out | 2 per half, the same two | The side that called it, then the other | Goes to the back bench | Yes |
| Halftime | 2, its own | The visitors, then home | Goes to the back bench | Yes |
| Before the shootout | 1, its own | Home, then the visitors | Goes to the back bench | No |
14.3.2 The Coaching Choice before the shootout positions nobody, because a shootout is played by who is on the field and by nothing about where they stand. It neither opens on a coach's arrangement nor records one.
14.4A new play always offers one
14.4.1 Every new play offers the side restarting play a Coaching Choice, however many they have already had this half, and it costs nothing; if they take it, the other coach gets one in reply.
14.4.2 Passing takes the reply down with it -- a coach who changes nothing was never asked for by anybody.
14.4.3 A time out is once a half, per side, and is the only Coaching Choice a side has to spend anything to get.
14.5How many substitutions
14.5.1 The substitutions are a separate count from either. A side has two substitutions per half, spent across every Coaching Choice it takes in that half -- new plays and its time out alike.
14.5.2 A side that has spent both may still coach: they get the rearrangement without the swaps.
14.5.3 The two come back at halftime. Between them, a side can substitute up to seven times in a game: two in each half, two more at halftime, and one before the shootout.
14.6Who may come on
14.6.1 While anybody is still sitting on the bench, substitutions come from the bench. Once it has drained, healthy players on the back bench may come back on.
14.6.2 An injured player never may, from either bench.
14.6.3 A player returning from the back bench keeps half their exhaustion tokens, rounded down.
14.6.4 The only side with nobody to bring on is one whose bench is empty and whose three back-bench players are all injured.
14.8Finishing a Coaching Choice
14.8.1 Every arrangement covers its own side's kickoff space, in every Coaching Choice and either half, and a coach may not finish while theirs is empty. Both sides kick off from the one space, and each owes it its own coverage. The standard deal and all five formations already satisfy it, so it only ever bites on a coach who has emptied the space with space positioning.
Note. That is what lets a restart kick off without anybody being moved back and charged for it.
14.8.2 The Coaching Choice before the shootout positions nobody, so it has no arrangement to hold to.
14.8.3 The positions a coach finishes on become that side's arrangement, and that is the shape every later new play puts them back on.
14.8.4 A coach who is offered a Coaching Choice and passes changes nothing, and keeps the arrangement they already had.
Part I -- The game
Law 15Exhaustion and injury
15.1Gaining tokens
15.1.1
| What costs tokens | How many |
|---|
| Entering a maneuver skill test, and every re-roll of it | 1 to each participant |
| Being sent to the ball -- a challenge, a loose ball, a contest, a pickup | 1 per space travelled |
| Running back | 1 per space travelled |
| An own-goal roll | 1 to the player rolling |
| Taking a scoring opportunity | 1 to the shooter, after the roll |
15.1.2 Nothing else costs anything. An ordinary score attempt, a maneuver won outright, a reset, a Coaching Choice and a shootout test are all free.
15.1.3 An injured player never exhausts.
15.1.4 Exhaust is the verb for gaining tokens: a player who exhausts 2 adds 2 exhaustion tokens to their card. Clearing (15.5) takes them off.
15.2Becoming Exhausted
15.2.1 A player is Exhausted the moment their tokens exceed their defensive skill. So a Fullback can carry six and be fine, while a Striker is Exhausted on their second.
15.3The injury check
15.3.1 When a skill test resolves -- a maneuver's, a contest for the ball, or a High Pass contest's -- every Exhausted participant rolls one d12. A roll higher than the tokens they are currently carrying is safe, and anything else injures them.
15.3.2 Tokens added for that very test count, including the ones a re-roll charged.
15.3.3 Only a skill test causes checks: a score attempt, an own-goal roll and a shootout test never do.
15.4Playing injured
15.4.1 An Injured player clears every token they hold and can add no more, so they can never be checked again.
15.4.2 Until they are substituted off:
- a. in a maneuver, against a healthy opponent, a tie loses outright with nothing rolled, and a maneuver they would have won outright goes to a skill test they have to win instead;
- b. in a contest for the ball or a High Pass contest, they add no skill modifier at all: their offensive or defensive skill comes off the roll, and only that. Ball speed and role abilities still apply.
15.4.3 Nothing else is withheld. The forced skill test above is rolled with their skill in full, and a score attempt is untouched -- an injured Striker still adds 3 off a set-up.
15.4.4 The maneuver disadvantage is measured against a healthy opponent, so two cases escape it: a tie where both participants are injured is an ordinary tie, and an unchallenged maneuver has no opponent at all and succeeds as always.
15.4.5 Nothing compels a coach to take an injured player off. They may leave them on, disadvantaged, for the rest of the game.
15.5Recovery
15.5.1 At halftime every fielded player clears 1 exhaustion, and each coach then chooses one of their fielded players to clear 1 more.
15.5.2 A player coming back on from the back bench keeps half their tokens, rounded down.
15.5.3 Nothing else clears a token.
Part I -- The game
Law 16The clock
16.1One clock
16.1.1 One clock runs over both periods: the first half from 00 through 15, the second from 15 through 30. It does not stop.
16.2Space minutes
16.2.1
| Action | Cost |
|---|
| Any maneuver except a High Pass or a Setup Pass | 1 |
| A High Pass, or a Setup Pass (19.7) -- the advanced High Pass | 2 |
| A score attempt | 1 |
| A scoring opportunity taken off a set-up | 1, on top of the maneuver's |
| A time out | 1 |
| Running back, resetting, a pickup, a contest, any roll, a Coaching Choice | 0 |
16.2.2 A maneuver's cost is flat. It does not depend on how far the ball or a player actually moved, or on whether the move was cut short by the end of the field.
16.3Last possession
16.3.1 When the clock reaches the period's last minute -- 15 in the first half, 30 in the second -- the action being resolved is finished in full, even if it turns the ball over.
16.3.2 Whichever team holds the ball once it has resolved has last possession: the side that kept it, or the side a turnover has just handed it to.
16.3.3 Their next turnover ends the period immediately. No run back, no reset, no Coaching Choice, and nothing else that turnover would have led to.
16.3.4 The clock keeps running through all of it, and every turn of a last possession is charged as usual. A period therefore ends on the minute its last turnover falls on, rather than on its last minute -- a first half can genuinely end at 19.
16.4Halftime
16.4.1 Every fielded player clears (15.5) a token, and each coach then picks one more player to clear one more.
16.4.2 The visitors take a Coaching Choice (14) and then home takes one, with two substitutions each. Those two are halftime's own: they are counted against neither half, and they leave each side's own once-a-half time out unspent.
16.4.3 Each coach finishes with a player on their own kickoff space.
16.4.4 The second half starts at 15 however far past 15 the first half ran, with the visitors kicking off from their own kickoff space at speed 1. Each half therefore gets the same fifteen minutes of play from its own kickoff. So minutes 15 and up can occur twice in a game -- once in the first half and once in the second -- which is why a goal is recorded with its period as well as its minute.
16.5Full time
16.5.1 The second half ends the way the first did: on the first turnover under last possession.
16.5.2 The higher score wins. A level score goes to the extreme shootout (17), after one substitution to each coach -- home first.
Part II -- Standard and advanced mode
Law 19Gambits
19.1A gambit is the advanced version of its rank
19.1.1 Advanced mode adds a gambit to every rank. A gambit does what the basic maneuver on its rank does, plus something more -- and costs the coach who played it something when it is beaten.
19.1.2 A gambit is the advanced version of the basic maneuver on its rank. Double Team is Pressure, advanced: it beats what Pressure beats, loses to what Pressure loses to, ties Pressure itself, and where the cards tie it resolves as Pressure. Rank alone decides who wins, so the cycle (6.3) is unchanged and the table below is the whole of what a coach has to learn about matchups.
| Gambit | Rank | Advanced version of |
|---|
| Skilled Pass | O1 | Low Pass |
| Dribble Burst | O2 | Dribble Advance |
| Setup Pass | O3 | High Pass |
| Clear | D1 | Deflect |
| Intercept | D2 | Steal |
| Double Team | D3 | Pressure |
19.2Only against a challenge
19.2.1 A gambit can only be played against a challenge. Where the defense sends nobody, the offense plays a basic maneuver -- so declining a challenge is a defensive weapon as well as a saving.
19.2.2 A coach who may play a gambit (19.3) chooses from six cards instead of three -- but only when the maneuver is challenged. An unchallenged maneuver is always played with a basic card.
19.3Who may play a gambit
19.3.1 A coach holds their gambits only while their team is behind, which is one of two things:
- a. their team has scored fewer goals than the other team;
- b. their team fields more Exhausted-or-Injured players than the other team. Only the six on the field count, and a Cyborg's Drained (20.3) and Damaged (20.3) are Exhausted and Injured under their own words.
19.3.2 It is read when the maneuvers are chosen, off the scoreboard and off the field, so who is holding gambits is public knowledge: neither coach learns anything from it the other cannot see for themselves.
19.3.3 Both coaches may hold them at once -- one trailing while the other is the more hurt -- and a coach neither is true of chooses from the basic three.
19.4When a gambit's effect fires
19.4.1 The cards decide, not the dice -- and they decide about each card separately.
| A gambit | Carries |
|---|
| Won on the cards | Its benefit, when it is the maneuver that resolves. |
| Lost on the cards | Its cost, paid by the side that played it. |
| Tied on the cards | Neither. The winner of the skill test resolves the basic maneuver on their rank instead. |
19.4.2 A tie is the commonest case where nothing fires, but it is not the test. What matters is what the cards said about that card. Everything below follows from it:
- a. an injured (15.4) participant's automatic loss of a tie carries nothing -- nobody won or lost on the cards; the injury only settled it without a roll;
- b. where the cards were decisive and the card-winner also wins the skill test their injury forced, both effects land where the cards put them: their benefit, and the loser's cost;
- c. where the card-winner is injured and loses that skill test, neither fires: the card now resolving lost on the cards, so it resolves as the basic maneuver on its rank, and the card that won on the cards is not paying a cost for a matchup it won.
Note. Twenty-four of the thirty-six pairings are decisive; twelve are ties and carry nothing either way.
19.5Skilled Pass
19.5.1 Rank O1. Costs 1 space minute. Beats Pressure and Double Team, loses to Steal and Intercept.
19.5.2 A Low Pass with the nearest-teammate rule taken off and a space more reach. The ball goes to any teammate up to 3 spaces away, ahead or behind; a nearer teammate blocks nobody. Where several are standing on the destination, the passer chooses which of them receives it.
19.5.3 Ball speed rises by 3, to a maximum of 12. Everything else is a Low Pass's: the pass has to reach a different player, a pass across a shared space also sends the passer 1 space forward, and a Winger may offer their receiver a scoring opportunity (8).
19.5.4 Midfielder: adds 3 to the skill test for their own Skilled Pass, as for a Low Pass.
19.5.5 Beaten: the defender who took the ball plays an unopposed Low Pass with it, once everyone has run back and the ball's speed is set. It costs the defense no clock -- the steal has already been charged.
19.6Dribble Burst
19.6.1 Rank O2. Costs 1 space minute. Beats Deflect and Clear, loses to Pressure and Double Team.
19.6.2 The handler carries the ball up to 4 spaces forward, and defenders are no obstacle. The coach chooses how far, and the handler exhausts 1 per space travelled. A handler nearer the end of the field than their run may go only as far as the field goes.
Note. It is the only maneuver that charges by distance, which is what makes the shorter runs worth taking.
19.6.3 Playmaker: may run up to 5 spaces instead of 4 -- an additional space, same as the Playmaker's Dribble Advance ability -- at the same token a space as everyone else.
19.6.4 The ball is left with the handler at speed 12 -- not a choice, and not bounded by anybody's skill.
19.6.5 Beaten: possession is lost, and the ball keeps the speed the burst put into it rather than resetting to 1 -- the one exception to every turnover resetting it (7.3). The defense then changes that speed by up to the challenger's defensive skill, as a steal's would.
19.7Setup Pass
19.7.1 Rank O3. Costs 2 space minutes. Beats Steal and Intercept, loses to Deflect and Clear.
19.7.2 Two steps, in this order. The passer first changes the ball's speed by up to their offensive skill, in either direction. They then pick the ball out 0, 1 or 3 spaces ahead. A teammate standing where it lands receives it and takes a scoring opportunity (8), with the speed they just set counting for it.
19.7.3 Every distance that fits on the field may be picked, whether or not anybody of the passing side is standing there. 0 is the one exception: it means a teammate sharing the passer's own space -- a passer never receives their own pass -- so it may only be picked while somebody else is standing there.
19.7.4 Fullback: may also set up at 4 spaces.
19.7.5 A pass that lands on nobody is still a pass. With no teammate where it lands there is no set-up, but the ball has been thrown all the same and it settles where it stops, exactly as a Deflect (6.8)'s does: loose (10.1) if the space is empty, and the other side's outright and uncontested if they are standing there. A space both sides are standing on is a teammate standing on it, so it is the set-up above rather than a contest.
19.7.6 A Setup Pass cannot overshoot, so the only way it runs out of play (10.5) is having nowhere to pick it out to at all: the passer standing on the very last space of the field, where even 1 space runs off the end, with no teammate beside them to take it at 0. Then the other team gains possession, both sides reset, and the gaining side sends somebody to pick the ball up.
19.7.7 Beaten: the coach who beat it drives the ball a further 1, 2 or 3 spaces back, their choice, and it lands exactly as a Deflect (6.8)'s does -- loose if the space it stops on is empty, uncontested if only one side is there, a forced contest if both are.
19.8Clear
19.8.1 Rank D1. Costs 1 space minute. Beats High Pass and Setup Pass, loses to Dribble Advance and Dribble Burst.
19.8.2 A Deflect at three spaces. The ball moves 3 spaces back, toward the goal the offense is defending, and ball speed drops by 3, never below 1. Neither player moves.
19.8.3 It lands exactly where a Deflect's does -- loose (10.1) if the space is empty, uncontested if only one side is there, a forced contest if both are -- including the deflection that runs out of field onto the player who played it, which offers that player -- and only that player -- a scoring opportunity (8) exactly as a Deflect's does. A Clear can run out of field from further out than a Deflect can, and one that leaves the player who played it behind sets up nothing.
19.8.4 Fullback: the ball goes back 4 spaces instead of 3. The speed still drops by 3 -- a Fullback's extra space is distance, not speed, exactly as it is on a Deflect.
19.8.5 Beaten: the defender who played it exhausts 2.
19.9Intercept
19.9.1 Rank D2. Costs 1 space minute. Beats Low Pass and Skilled Pass, loses to High Pass and Setup Pass.
19.9.2 A Steal with the sign flipped. Possession flips and ball speed resets to 1, and the challenger and the ball then move 1 space forward -- toward the goal the new possessing team attacks, rather than back toward the one they defend. It is the only card that moves the ball against the way the offense was going.
19.9.3 A defense contesting with Intercept adds the ball speed modifier (7) to the skill test, as a Steal does.
19.9.4 Midfielder: adds 3 to the skill test for their own Intercept, as for a Steal.
19.9.5 Once everyone has run back, the interceptor changes the ball's speed by up to their defensive skill. The ball is left with the interceptor, who therefore does not run back.
19.9.6 Where the interceptor is already on the last space that way there is nowhere to carry it, and the interception is a scoring opportunity (8) for them instead.
19.9.7 Beaten: a High Pass contest (10.4) the pass would have owed is not held -- the receiver simply keeps the ball.
19.10Double Team
19.10.1 Rank D3. Costs 1 space minute. Beats Dribble Advance and Dribble Burst, loses to Low Pass and Skilled Pass.
19.10.2 A Pressure at two spaces, with help. The handler and the ball go 2 spaces back, and the challenger and the defending player nearest the space the play started from both move onto the handler's space -- free of exhaustion, however far they came.
19.10.3 Possession does not change and the ball is left with the handler. Where the handler is already on the space closest to their own goal there is nowhere to push them, and it risks an own goal (11) as a Pressure does. A Defender's steal applies as it does on a won Pressure.
19.10.4 On the defending side's next maneuver both of those players challenge, and the skill test adds both of their defensive skills. It lasts until a new play (12.5), which is the only thing that ends it.
19.10.5 Beaten: the challenger and that same nearest teammate each move 1 space forward, away from their own goal. Neither exhausts for it.
Part II -- Standard and advanced mode
Law 20Species abilities
20.1One ability per species
20.1.1 There is one ability per species, and every player of that species has it whichever team is fielding them. A player fielded on both sides of one game -- the same person in two kits -- carries it on both cards.
20.1.2 The species abilities are played in standard mode and in advanced mode, and never in training mode.
20.2Volatile (Fire Demon)
20.2.1 A Fire Demon's die can ignite. In the rolls listed below, when the die's own face -- before any skill or modifier -- comes up a natural 6 or 7, the Fire Demon immediately rolls a second d12:
- a. 5-12: a blaze. Add the second die to the Fire Demon's total for that roll.
- b. 1-4: a burn. Subtract it.
20.2.2 Ignite is not a choice, and the second die never ignites in turn -- one reroll, however it falls.
20.2.3 Four rolls are covered: their die in a skill test (6.4) or a contest for the ball (10.1) -- and if both players rolling are Fire Demons, each checks their own -- the shooter's die in a score attempt (5), and a shootout test (17). An injury check (15.3) and an own-goal roll (11) never ignite: a natural 6 or 7 there is only a 6 or 7.
20.2.4 In a maneuver skill test the blaze or burn can decide a tier. Four cases, one for each way an ignite can land:
- a. A blaze that wins resolves that side's maneuver as its advanced version -- the gambit on its rank -- even where the cards would have resolved the basic maneuver (19.4), and whether or not that coach may play a gambit (19.3) this turn. A maneuver already resolving as a gambit gains nothing more.
- b. A burn that loses resolves the opponent's maneuver as its advanced version, the same way.
- c. A blaze that loses and a burn that wins change nothing but the number.
20.2.5 An ignite never decides a gambit's cost (19.4). A player who loses the skill test pays their own gambit's cost exactly where they would have without the ignite, whichever way it went.
Note. A blaze that wins is an upgrade nearly every time: a skill test usually means the cards tied, and a card that did not win on the cards does not resolve as a gambit on its own, so even a player who did play the gambit gets it resolving as one for the first time. A burn that wins won carrying a penalty; the rider is the loser's to hand over, not theirs to earn.
20.2.6 Outside a maneuver skill test -- or in standard mode, which plays the species abilities without the gambits (19) -- there is no tier to change, and the blaze or burn is only the number.
20.3Lithium Powered (Cyborg)
20.3.1 A Cyborg's tokens are drain. They are added and spent exactly as exhaustion tokens -- wherever a rule has a player exhaust or clear an exhaustion token, a Cyborg adds or clears a drain token instead -- but a Cyborg does not become Exhausted (15.2) on the ordinary threshold.
20.3.2 Drain is also the verb, as exhaust (15.1) is everybody else's: a Cyborg who drains 2 adds 2 drain. Wherever a rule has a Cyborg exhaust, they drain that many instead.
20.3.3 A Cyborg carrying 7 or more drain is Drained, which counts as Exhausted everywhere the rules use that word: the injury check (15.3) after a skill test, the halftime recovery (15.5) re-test, and anywhere else. Below 7 a Cyborg is never Exhausted, however low their defensive skill.
20.3.4 A Cyborg's injury check is a damage test, and a Cyborg who fails it is Damaged, not Injured. It is the same check and the same disadvantage under the Cyborgs' own words -- everywhere the rules say injury check (15.3) or Injured (15.4), a Cyborg's damage test or a Damaged Cyborg is meant, and nothing about the check, the disadvantage or the substitution rules differs for them. Only the words (and the token art) are a Cyborg's own.
20.3.5 Overdrive. Once per roll, before the die is thrown, a Cyborg may drain 3 to add +5 to that roll. It is declared blind. It may be spent on any d12 the Cyborg themselves rolls -- a skill test (6.4), a score attempt (5), an own-goal roll (11), a damage test (15.3), a contest (10.1) or a shootout test (17).
20.3.6 A tie that is rolled again is a fresh roll: the +5 does not carry, and the re-roll may be Overdriven by draining another 3. A Drained Cyborg may still Overdrive -- the drain stacks. Overdrive is a flat bonus rather than a skill modifier, so a Damaged (15.4) Cyborg keeps it.
20.3.7 Charge-up. Whenever players run back (12.4), a Cyborg who does not move clears 1 drain. Once per run back, never below zero.
20.3.8 Any player who moves is running back, whatever moved them and however far, so any Cyborg who moves clears nothing. A player standing outside their own zone has to return and therefore can never charge up; a player already in their own zone charges up unless something moves them anyway, and the carrier who never runs back (12.4) charges up like anyone else standing still.
20.3.9 Where several of a side's players share a space and one of them must go to an uncovered space in that zone, the coach chooses which -- and a Cyborg among them charges up only if they are not the one sent.
Note. Holding a Cyborg still is a real reason to send somebody else.
20.3.10 A new-play reset (12.5) is not a run back and triggers no Charge-up.
20.4Mind Pull (Telekinetic)
20.4.1 When the opponent's ball moves to or through a Telekinetic's space -- it passes over the space on its way somewhere, or comes to rest on it -- the Telekinetic may exhaust 1 and roll one d12. On 11-12 they pull the ball in: it stops on their space, their side takes possession, and the Telekinetic holds it.
20.4.2 The token is paid whether or not the pull lands, and Mind Pull is a choice. The roll is not a skill test and owes no injury check (15.3).
20.4.3 The ball's own starting space does not count as "moved to" -- only a ball changing spaces can be pulled, and only the opposing team's ball.
20.4.4 Whoever the movement itself moved is not offered a pull, or a Smooth. The ball has to move to or through a space the player was already standing on and stayed on: a player the maneuver carried never had it move to them, because they and it arrived together. So the challenger a Pressure (6.10) brings forward onto the ball is owed nothing for it, nor is a Double Team (19.10)'s partner, nor the handler either card shoves back, nor the handler of a dribble (6.6) who moves with the ball by definition. A player shoved nowhere -- already against their own goal, with the push clamped to nothing -- has not been carried, and is offered whatever they would have been offered standing still.
20.4.5 One roll per Telekinetic per ball movement. Where the ball's path crosses two Telekinetics, each may try in the order the ball reaches them; the first to succeed stops the ball there and the rest get no roll.
20.4.6 Only a live ball can be pulled. A ball being brought back into play after it has gone dead -- the kickoff after a goal (5), the restart after a shot that missed, a second-half kickoff (16.4) -- is carried to where play starts again rather than travelling over the spaces between, so it crosses nobody and offers nobody a pull however far it goes.
20.4.7 Mind Pull resolves before the ball settles where it comes to rest (10.1): a pull that lands pre-empts whatever the movement would have led to -- a reception, a scoring opportunity, a contest, a loose ball. A pull that misses or is declined leaves all of that to resolve as normal, the Telekinetic included if the ball comes down where they stand.
20.4.8 A successful pull is a steal (12): ball speed resets to 1, players run back, and the Telekinetic is the carrier who does not. The maneuver that moved the ball still costs its space minute.
20.4.9 Smooth. The other half of the ability, with the price taken off. When the Telekinetic's own side has possession and the ball comes to rest on their space, they may take it over: no token, no roll, and it cannot fail. The ball stays on their space and they become the carrier (4.2).
20.4.10 Smooth is offered only where the ball arrives, never on a space it passes through -- the one place it parts from a pull. A Telekinetic the ball merely crosses on its way somewhere else is offered nothing. The rest of the path reading holds as it does for a pull: the ball's own starting space does not count as moved to, a ball that goes nowhere arrives nowhere, and a ball being brought back into play after it has gone dead reaches nobody. Where several of a side's Telekinetics stand on the space the ball arrives at, each is asked in turn and the first to take it holds it.
20.4.11 Taking it over means taking it off somebody, so the player the movement is delivering it to is not offered a Smooth. A Low Pass (6.5) aimed at a Telekinetic, a Telekinetic who catches a High Pass (6.7) or a Setup Pass (19.7), a Telekinetic who has just taken the ball by Steal (6.9) or Intercept (19.9) -- each of them ends the movement holding the ball anyway, and there is nothing left for the ability to change. A teammate standing on the same space as the intended receiver is offered one, and taking it is what makes them the carrier instead.
Note. It is the same sentence as the one above about whoever the movement moved, read at the other end: a Smooth is for a ball that was going somewhere else.
20.4.12 Smooth resolves before the ball settles, and takes with it whatever the arrival was going to lead to -- a reception, a scoring opportunity, a contest. A Pressure that risks an own goal (11) moves the ball nowhere, so it reaches no space and offers no Smooth.
20.4.13 Smooth is not a turnover (12). Possession never changed hands, so nobody runs back, ball speed is untouched, and the turn simply ends with a different player holding the ball. The one movement Smooth cannot pre-empt is a run back that a turnover has already caused: there the Telekinetic takes the ball over and the run back still happens, with them as the carrier who stays.
20.4.14 Both halves are asked on one movement, Mind Pull first. Every pull the movement offers -- on a space the ball passes through or on the space it lands on -- is offered before the Smooth where it lands. A pull that lands ends the movement and no Smooth is offered; once every pull has been declined or has missed, the Smooth is offered exactly as it would have been.
20.5Slimey (Ooze)
20.5.1 Merge. In a maneuver skill test (6.4), a contest for the ball (10.1) or a High Pass contest (10.4) fought out on the ball's space, an Ooze standing there who is not one of the two players rolling adds to their own side's total: their offensive skill on the attacking side, their defensive skill on the defending side. Every such Ooze adds -- two of them add twice. An injured (15.4) Ooze adds nothing.
20.5.2 Merge in a score attempt (5) is the attack alone. An Ooze standing on the ball while a teammate shoots adds their offensive skill to the attack. The defence gains nothing from it: defending players on and beyond the ball are already counted by what the defense adds (5.3), and an Ooze among them is not counted twice.
20.5.3 Spreadable. Every Ooze counts as 0 toward its own zone's occupancy (2.5), always -- nothing for a coach to declare. It still has exactly one meeple on exactly one real space; the rule is a coverage exemption only, not a second body on the board, so nothing about a challenge, where the ball can be sent, or a genuine run back off the space changes.
20.5.4 The one place it reaches further is a stack: an Ooze sharing a space with a teammate assigned to the same zone is never made to break that stack up to cover another space in the zone, and neither is the teammate.
Part II -- Standard and advanced mode
Law 21Personal abilities
21.1Whose they are
21.1.1 Some players carry an ability of their own, and five carry an advanced skill. Both are played in advanced mode (18.1) and in no other. A personal ability belongs to the player rather than their role or their species, so a player fielded on both sides of one game carries it on both cards.
21.1.2 A personal ability is played beside the player's role ability, never instead of it: a player keeps their role's ability in advanced mode. The advanced side of a card prints the personal ability in the role's place, and the role's is on the other side.
21.1.3 Most personal abilities change the player's own species ability (20). Where the two say different things, the personal ability wins for that player, and everything it does not mention works as the species ability says.
21.2Advanced skills
21.2.1 A player's advanced skill replaces their role's skill of the same kind, everywhere a skill is added or read, and a player with no advanced skill of that kind keeps their role's. An advanced skill is not held to 1 to 6, and a player's two skills need not total 7.
| Player | Offense | Defense |
|---|
| Flux (Defender, Cyborg) | 5 | 5 |
| Gurgoth (Defender, Ooze) | 5 | 6 |
| Hellguard (Fullback, Fire Demon) | 0 | 8 |
| Ozul (Playmaker, Ooze) | 6 | 5 |
| Tachyon (Striker, Cyborg) | 6 | 4 |
21.3Fire Demons
21.3.1 Blazebulk always blazes. When their die ignites (20.2), the second die is added whatever it shows; Blazebulk never burns.
21.3.2 Sizzifizik ignites on 5 to 8. Their die ignites on a natural 5, 6, 7 or 8, in the rolls Volatile covers.
21.3.3 Brightburn's burn upgrades nothing. A burn that loses a maneuver skill test does not resolve the opponent's maneuver as its advanced version. Every burn, in any roll, clears 1 token from Brightburn.
21.3.4 Emberdash runs further. Emberdash's Dribble Advance (6.6) may go up to 3 spaces, and their Dribble Burst (19.6) costs no exhaustion.
21.3.5 Flickerwing shoots past the wall. In every score attempt (5) Flickerwing makes -- off a set-up (8) or not -- only the defending players standing on the ball's space add their skill to the defense; a defending player between the ball and the goal adds nothing.
21.3.6 Inferno lights the ball. Whenever Inferno receives the ball -- is left holding it, however that happened: a pass, a steal, a won contest, a pull, a Smooth, or picking it up (10.6) -- its speed goes to 12. Being chosen to handle a ball they were already standing on is not receiving it. Anything that sets the speed later in the same resolution, such as the speed step after a Steal (6.9), still does.
21.3.7 Kindlefinger's injury check can ignite. Kindlefinger's die in an injury check (15.3) ignites on a natural 6 or 7 exactly as a Volatile (20.2) roll does, and the blaze or burn is added to or subtracted from the check. A blaze also clears 1 token from Kindlefinger and on a burn they exhaust 1, before the check is compared with their tokens -- so the token can decide it, as the tokens a skill test charges count toward the check that follows it.
21.3.8 Scorchit may force the test. When Scorchit's maneuver loses on the cards, their coach may send it to a skill test (6.4) anyway, once the cards are revealed and before anything resolves. Entering it, Scorchit exhausts 2 and their opponent nothing; a tie is rolled again and each exhausts 1, as always. The higher total wins and their maneuver resolves. A gambit's effect still follows the cards, as it does after a test an injury (15.4) forced: if the card that won on the cards also wins the test, its benefit and Scorchit's cost both land; if Scorchit wins the test, neither fires and Scorchit's card resolves as the basic maneuver on its rank. Where the winner on the cards is injured, the test is the one their injury already forces, and costs its usual token each.
21.4Cyborgs
21.4.1 Bulwark is Drained at 10. Bulwark is Drained at 10 or more drain tokens rather than 7, and never below.
21.4.2 Voltus Overdrives for 2. Voltus's Overdrive (20.3) drains 2 rather than 3, for the same +5.
21.4.3 Gearclaw may Boost. Once per roll, before the die is thrown, Gearclaw may drain 1 to add +3 to that roll. It is declared blind, on any roll Gearclaw could Overdrive, and follows every rule of Overdrive. Boost and Overdrive are each once per roll, and neither excludes the other: on one roll Gearclaw's coach may Boost, Overdrive, do both -- draining 4 for +8 -- or do neither. A tie that is rolled again is a fresh roll, on which each may be declared once more.
21.4.4 Strider runs on less. When Strider charges up (20.3), they clear 2 drain rather than 1. A run back (12.4) drains Strider 1 at most, however far they run.
21.4.5 Quantor runs onto the pass. When a teammate's won High Pass (6.7) or Setup Pass (19.7) is about to resolve, Quantor may drain 3 to move to the space the pass is aimed at and receive it there, without a contest. The pass then resolves with Quantor as its receiver: a High Pass of 2 in range and a Setup Pass set up Quantor's scoring opportunity (8), and a longer High Pass is simply received. It is declared with the pass's distance, only for a distance whose space is on the field, and never on Quantor's own pass.
21.4.6 Pulsar charges up on the ball. Whenever Pulsar receives the ball, as Inferno does, they clear 1 drain, never below zero.
21.4.7 Synapse's Overdrive decides a tier. When Synapse wins a maneuver skill test on a roll they Overdrove, their maneuver resolves as its advanced version -- the gambit on its rank -- whether or not their coach may play a gambit (19.3) this turn, exactly as a blaze that wins (20.2) does. A maneuver already resolving as a gambit gains nothing more.
21.5Telekinetics
21.5.1 Noxar pulls from beside them. Noxar may Mind Pull (20.4) a ball that moves to or through a space next to their own, as well as their own space. A pull that lands brings the ball to Noxar's own space.
21.5.2 Quillon pulls for free. Quillon takes no token for a Mind Pull.
21.5.3 Spectra pulls harder. Spectra's Mind Pull succeeds on 9 or more.
21.5.4 Dravox and Hexis play their gambits on the dice. When Dravox wins a maneuver skill test with a defensive gambit they played, or Hexis with an offensive one, it resolves as the gambit -- where a card that did not win on the cards would otherwise resolve as its basic maneuver (19.4). A basic card they played is not upgraded.
21.5.5 Umbrik plays the long ball on defense. Umbrik adds their defensive skill rather than their offensive skill to an own-goal roll (11) and to a maneuver skill test over their own High Pass (6.7). A High Pass contest (10.4) they receive in is played on their offensive skill as usual.
21.5.6 Vorix's long pass is a set-up. When Vorix's won High Pass of 3 spaces reaches a teammate, there is no High Pass contest: the ball's speed goes to 12, the teammate receives it, and they may take a scoring opportunity (8) if it is in range, exactly as off a 2-space pass.
21.5.7 Zenith flies. When a steal (12.4) is about to run players back, Zenith's coach may first move Zenith to any space on the field, exhausting 1 for every space travelled. Zenith then does not run back. An injured (15.4) Zenith cannot fly, nor can Zenith holding the ball, and a new-play reset (12.5) is not a run back.
21.5.8 Zytheris shoots off any pass. Whenever a teammate's pass is received by Zytheris, they may take a scoring opportunity (8) if it is in range -- after a Low Pass (6.5) or a Skilled Pass (19.5) as after a 2-space High Pass. A High Pass of 3 or more is contested as usual, and only if Zytheris wins the High Pass contest (10.4) -- or keeps the pass because nobody contests it -- may they then take the scoring opportunity.
21.6Oozes
21.6.1 Glompex joins the ball. Once a maneuver's challenger is in place and before either coach chooses a card, Glompex -- standing on a space next to the ball's, and not one of the two players -- may exhaust 1 to move onto the ball's space, where Merge (20.5) counts them. It is offered only against a challenge, since an unchallenged maneuver rolls nothing.
21.6.2 Goopkeeper blocks in full. In a score attempt (5), Goopkeeper standing anywhere between the ball and the goal counts as on the ball, and adds their full defensive skill rather than half. Behind the ball they add nothing, like anyone else.
21.6.3 Slitheron wins every contest. In any contest for the ball (10.2) -- a High Pass contest (10.4), a loose ball (10.3) both sides sent somebody after, or a ball that comes to rest where Slitheron and an opponent are both standing, such as a Deflect (6.8) landing on them -- Slitheron takes the ball without a roll. Nothing is rolled, so nobody owes an injury check for it. Against another player with the same ability, the contest is rolled as usual.
21.6.4 Viscor merges harder. Whenever Viscor Merges (20.5) -- adds their skill to their side as an Ooze on the ball who is not rolling -- they add 3 more.
21.6.5 Shpritz may Smooth. Shpritz has the Telekinetics' Smooth (20.4), and takes their own side's ball over exactly as a Telekinetic does. Shpritz has no Mind Pull.
21.6.6 Zorch rolls with the ball. Zorch adds the ball speed modifier (7) to every roll they make: a maneuver skill test (6.4) on either side, a contest for the ball (10.2), an injury check (15.3) and an own-goal roll (11). Where the roll already adds the modifier to Zorch's side -- Zorch's score attempt (5), a skill test Zorch contests with Steal or Intercept, or the throwing side of a High Pass contest (10.4) -- it is added once, not twice, and an overshoot (7.5) still counts it against the pass. A shootout test (17) adds it too, but full time has turned the ball over and left it at speed 1 (Turnovers reset it (7.3)), so the modifier is 0. The defense's die in a score attempt is not Zorch's own roll, so Zorch defending a shot adds nothing, even as the only defender in the way.
21.6.7 Acidel turns a pressure into a shot. When Acidel is the challenger whose won Pressure (6.10) or Double Team (19.10) would risk an own goal (11), there is no own-goal roll: Acidel's side takes the ball, at speed 1, and Acidel has a scoring opportunity (8) from that space. Declining it leaves Acidel's side holding the ball where it stands.